How To Install Undermount Drawer Slides?
One of the most popular innovations in modern cabinetry and furniture design is the use of undermount drawer slides . These mechanisms offer a clean, seamless look while providing smooth, reliable motion for drawers. Whether you're a DIY enthusiast or a professional cabinetmaker, understanding how to install undermount drawer slides can significantly enhance both the performance and appearance of your cabinetry.
Understanding What Undermount Drawer Slides Are
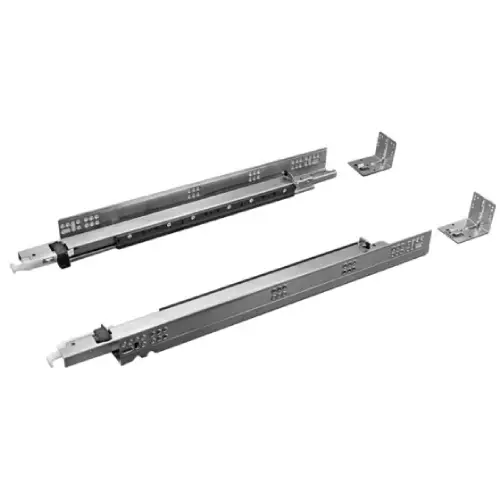
Before diving into installation, it's important to understand what undermount drawer slides are and why they're preferred over traditional side-mount systems. As the name suggests, these slides are mounted underneath the drawer rather than on the sides. This allows for a full overlay front panel without any visible hardware, creating a sleek and modern look.
Undermount slides typically come in two main varieties: ball bearing and roller based systems. Ball-bearing models provide smoother motion and greater weight capacity, making them ideal for heavy-duty applications such as kitchen cabinets or deep drawers. Roller-based slides, while more affordable, may not offer the same level of durability or quiet operation.
Filta specializes in high quality, soft close undermount drawer slide that combine strength with precision engineering. These products are designed to integrate seamlessly into contemporary cabinetry while offering years of dependable service.

Why Choose Undermount Cabinet Drawer Slides?
One of the primary reasons professionals and homeowners alike opt for undermount cabinet drawer slides is the aesthetic advantage. Since they're hidden beneath the drawer, they don't interfere with the cabinet's visual design. This is especially valuable in minimalist or handleless kitchens where every detail counts.
Additionally, undermount slides often allow for full extension, meaning the entire drawer can be pulled out without obstruction. This feature is particularly useful in deep storage units or pantries where accessibility is crucial.
Another benefit is the ability to support heavier loads compared to traditional side-mount slides. When installed correctly, undermount cabinet drawer slides can easily handle weights ranging from 100 to 200 pounds, depending on the model.
Tools and Materials Needed for Installation
Before beginning the installation process, gather all necessary tools and materials. Having everything ready will help ensure a smooth and efficient workflow. Here's what you'll need:
Cordless drill or screwdriver
Measuring tape
Level
Pencil
Clamps (optional but helpful)
Screws specific to your slide model
Pre-drilled mounting brackets (if not included with the slides)
Make sure the drawers and cabinet frames are fully assembled and square. Any misalignment at this stage can cause issues during installation and affect the performance of the slides.
Step-by-Step Guide: How to Install Undermount Drawer Slides
Installing undermount drawer slides might seem complex at first, but with careful planning and attention to detail, it can be done efficiently. Below is a detailed breakdown of the process:
1. Measure and Mark Mounting Points
Start by measuring the depth of the drawer box and the corresponding cabinet opening. Most undermount drawer slides require a clearance of approximately ½ inch on each side to allow for smooth movement. Use a pencil to mark the centerline of the slide on both the drawer and the cabinet frame.
Ensure that the marks are level and consistent across both sides. If possible, use a laser level for accuracy.
2. Attach the Slide to the Drawer
Align the undermount slide with the marked line on the inside bottom of the drawer. Make sure the roller mechanism faces outward. Secure the slide using the provided screws. Repeat the process on the opposite side.
If your slides include adjustable brackets, now is the time to set them according to the manufacturer's instructions. These brackets allow for minor adjustments after installation, which can be invaluable for fine-tuning alignment.
3. Mount the Slide to the Cabinet Frame
Next, position the other half of the slide onto the cabinet frame. Again, align it with your previously marked lines and secure it using screws. Double-check that both sides are parallel and equidistant from the front edge of the cabinet.
Some advanced undermount cabinet drawer slides come with built-in dampers or soft-close features. These mechanisms prevent slamming and extend the life of the drawer. Be sure to follow the specific installation guidelines for such models.
4. Test the Drawer Movement
Once both sides are secured, gently insert the drawer into the cabinet. Open and close it several times to check for smooth operation. If there's resistance or misalignment, loosen the screws slightly and make micro-adjustments until the drawer moves freely.
It's also a good idea to test the drawer when fully loaded to ensure it remains stable and doesn't sag at the front.
Common Mistakes to Avoid When Installing Undermount Drawer Slides
Even experienced woodworkers can run into problems if they rush through the installation. Here are some common mistakes to watch out for:
Improper alignment : Even a small deviation can lead to binding or uneven wear.
Using incorrect screws : Always use the screws recommended by the manufacturer to avoid stripping or damaging the bracket holes.